Getting Started With Non-relational Databases Using Mongodb
What is a relational database?
If you’ve worked with databases for a while, chances are, you started your career using a relational database. Examples of a relational database are Microsoft Access, MySql, Oracle, etc.
A relational database is the conventional database that uses table to store data. In a relational database, each field data type is defined. That is if you define a particular field to accept only numbers for example age of a person, that field will not accept any character from a-z.
What is a non-relational database?
Before discussing fully what a non-relational database is, it is needful to define some key terminologies which can help us better understand non-relational database and how it operates. These are:
• Key-value pairs.
• Document.
• Collections.
Key-value pairs
Key value pairs are identifiers and corresponding values. A simple way to know how this work is assuming one walks into a bar and ask for the waiter. The “waiter” in this scenario is the identifier while the name of the waiter for example “John Doe”, is the value. So in JSON format, this can be represented as shown below.
{
    "waiter": "John Doe"
}
What is a document?
Documents are a set of JSON data. It is basically a set of key-value pairs that give you detailed information about an entity. Below, is an example of a document for our waiter example. It contains personal information about the waiter.
{
    "id": 1,
    "name": "John Doe",
    "username": "johnd",
    "email": "johndoe@mongo.com",
    "phone": "1-902-723-4231 x56442",
    "website": "johnd.org"
}
What is a collection?
Collections are a set of documents. That is information about more than one entity. In a relational database, collections are what are known as tables.
[
  {
    "id": 1,
    "name": "John Doe",
    "username": "johnd",
    "email": "johndoe@mongo.com",
    "phone": "1-902-723-4231 x56442",
    "website": "johnd.org",
  },
  {
    "id": 2,
    "name": "Ervin Howell",
    "username": "Antonette",
    "email": "Shanna@melissa.tv",
    "phone": "010-692-6593 x09125",
    "website": "anastasia.net",
  },
  {
    "id": 3,
    "name": "Clementine Bauch",
    "username": "Samantha",
    "email": "Nathan@yesenia.net",
    "phone": "1-463-123-4447",
    "website": "ramiro.info",
  }
]
So with the aforementioned defined terms, we can define a non-relational database as a database that stores data in JSON-like format which is achieved through key-value pairs. Examples of non-relational databases are MongoDB, Redis, Couchbase, etc.
Getting started with MongoDB?
MongoDB is a non-relational database. That is, it doesn’t store data in columns and rows but in BSON format. It is an open-source database founded in 2007. Open-source applications are software whose codebase is open to contributions from other developers.
Working with MongoDB can be in two variants. We can either access it online using MongoDB atlas or we download it locally on our computer. For local downloads, we have two editions which are enterprise and community editions. The enterprise edition is the paid version while the community version can be used for free, obviously with limited capabilities when compared to the former. To understand how to install and download it locally, click here
For this article, we’ll be working it online. We can access it online via
• MongoDB shell
• MongoDB compass
For other methods on how to use MongoDB, click here
Registering for MongoDB Atlas
Before using any of the tools to start performing database operations, you need to register an account with MongoDB Atlas. It is a cloud database, that is all instead of hosting your own server, you just need to register and it’ll take care of what you need to do at the backend. To create an atlas account, follow the steps below
- Go to www.mongodb.com
- For practice, click on the Try Free option. This allows you to work with Atlas for development purposes.
- A bio-data form will come up, fill in the required details. You can also use your Gmail account to sign up.
- Next, you log in using the login details you just created
- You can now proceed with deploying a free cluster by clicking on Build a cluster.
- Three different option is available to you, the dedicated and serverless option are both paid version, for development purpose, click on the shared version.
- You can now proceed to select a cloud provider and region.
- Click on create cluster button.
- After registration, you need to create a username and password alongside enabling database access.
- Click database access. It will prompt you to add a database user.
- Enter your preferred username and password.
- Click on network access on the left pane.
- Click on Add IP Address.
- You can choose to allow specific IP addresses, or for development purposes, you can just allow access from anywhere.
- Click on confirm. Now you can proceed to use MongoDB Shell or Compass.
You can check MongoDB's official documentation if you encounter any errors.
Using MongoDB shell
MongoDB shell is a command-line environment that can be used to access your database. To install mongo shell, click here
Using MongoDB compass
MongoDB Compass is a tool like MongoDB shell that can be used to interact with our database. However, unlike MongoDB shell which is primarily a command prompt interface, compass has a graphical user interface that makes it easy to work with.
To download and work with compass, follow the instruction below; click here
• Download and install.
• Go back to your Atlas homepage, click on connect.
• Click on connect using MongoDB Compass.
• Copy the connection string from Atlas and paste it into the file path shown below.
• Click connect.
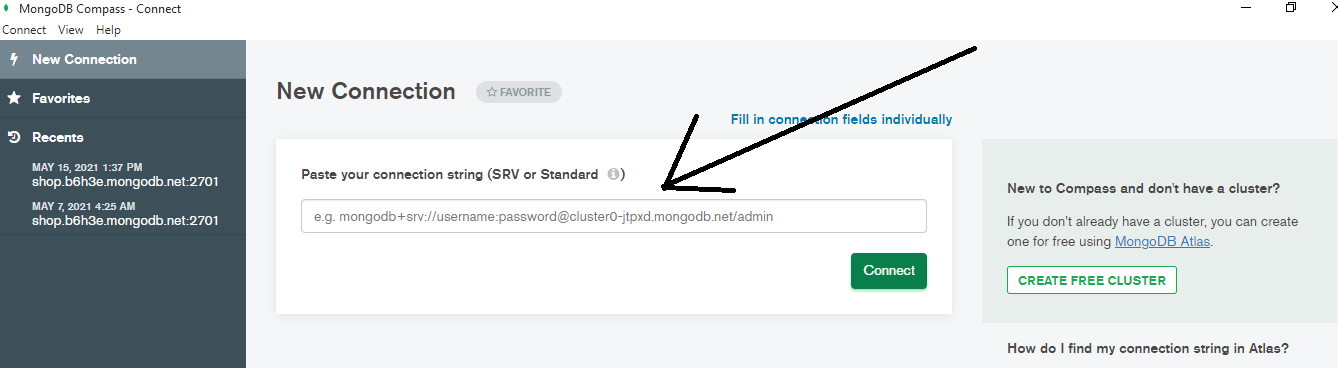
Note: if at the point of connecting, you get this “error: querySrv ENOTFOUND _mongodb._tcp.l.” This can mean that your password or username contains special characters, and special characters need to be URI Encoded for it to connect to your database.
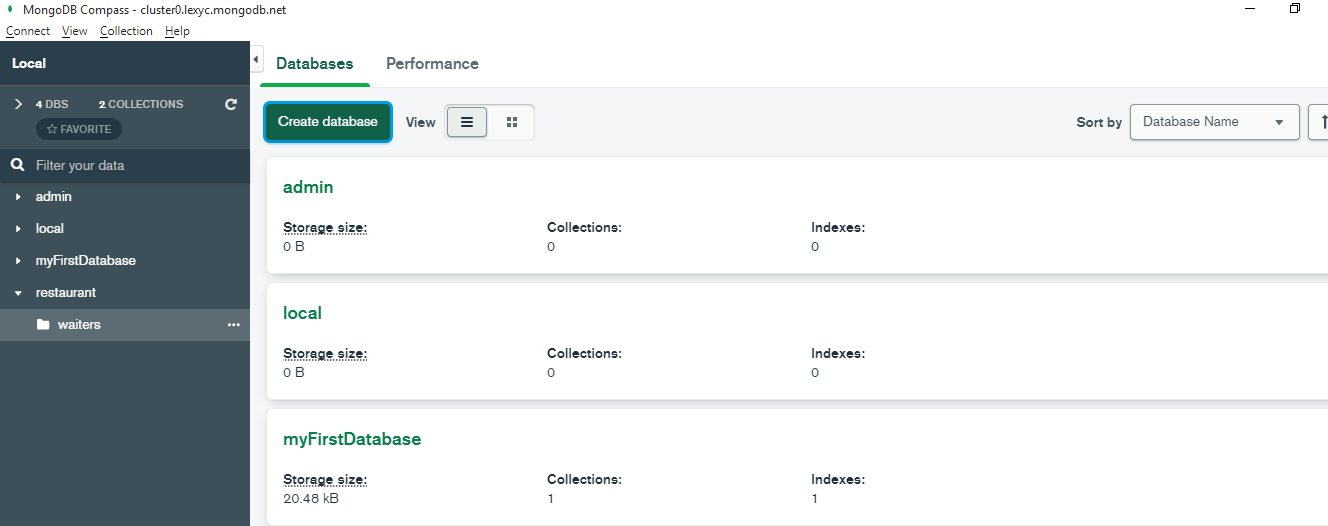
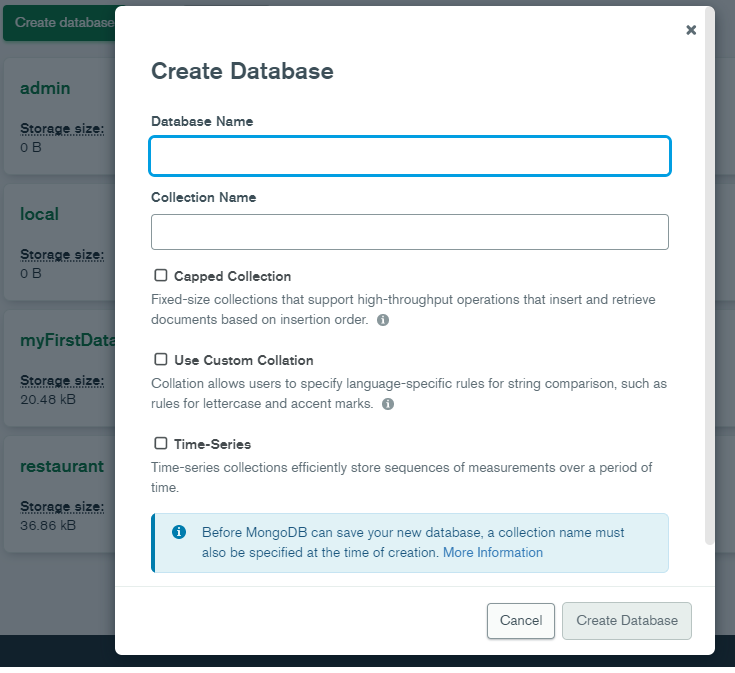
If your connection is successful, you should see a screen similar to the one below. All databases created will be listed. You can view them by clicking on each one. And you can also create a new database by clicking on the create database button.
MongoDB compass lets you create your database, collection, and document in a very seamless way. If you would like to explore more, you can refer to the official documentation. For this tutorial, we’ll be focusing on the MongoDB shell which is a little bit complex. So let’s look at how we can perform CRUD operations using the MongoDB shell.
Performing CRUD operations on our database
CRUD is an acronym for creating, reading, updating, and deleting in programming. For one to perform the read, update or delete operation, a record has to be created initially on the database. Creating a record is to add data about an entity. Read operation means to get or view records in the database. The update operation is to make changes to the record that is in view. Delete operation means to remove a specific record.
Let’s look at how to perform these operations using MongoDB.
Creating a record
In this article, we’ll be creating waiters' records to explain the CRUD operations. Before creating our first waiter record, you need to login into your database using the steps below.
• Sign in to your atlas.
• Click on connect.
• Copy the URI connection string.
• Paste this connection string in your mongo shell, ensure you change the username to your correct username.
• It’ll require you also type your password, after which it connects to the database.
• If your connection is successful, you should see a screen like the one below.

Creating our first waiter record
Before creating your record, you want to ensure you even have a database that can hold your collections. Your collections hold your record remember? After logging in to your mongo atlas via your shell, you get a default database named myFirstDatabase but you can always create another. You can use the use function in creating a database. So, we’ll be creating a database called restaurant with the line below.
use restaurant
Now, we are ready to create our waiter collection, then add waiters' records to the collection. To create a collection, we use the createCollection syntax.
db.createCollection("waiters")
Inserting a record
To insert a waiter record into our waiter's collection, we can use either of the insertOne syntax that inserts only one record into the database or we use the insertMany syntax that allows us to insert more than one waiter record into the database. I’ll show you how to do both. InsertOne syntax
db.waiters.insertOne({name: "John Doe", username: "johnd", email: "johnd@waiters.com", date: Date()})
The statement above inserted one waiter record into the database.
InsertMany syntax
db.waiters.insertMany([
{name: "Nath Doe", username: "nathd", email: "nathd@waiters.com", date: Date()},
{name: "Jane Doe", username: "janed", email: "janed@waiters.com", date: Date()},
{name: "Sam Saul", username: "sams", email: "sams@waiters.com", date: Date()}
])
This statement inserted three records into the database successfully.
So this is how we create records in MongoDB. Next, we are going to see how records can be fetched or read from the database.
Reading (fetching) records
To fetch a record also means to read a record. It just depends on the particular database we are working with. For some databases, this can be GET or SELECT as in the case of Redis or MySQL respectively.
To fetch records in MongoDB, we use the find() function. Using the find() function alone will get all our records stored in the database.
db.waiters.find()
To get a particular record, we have to type in the conditional of what we are trying to get. Let’s say we are trying to get a user who has the username of johnd.
db.waiters.find({username : "johnd"})
Updating Record
Updating a record means making changes to a particular field. Going back to our waiter example, imagine Jane Doe is getting a divorce from John Doe, so she wants her name in the database changed to her maiden name. We’ll do that with the line of code below.
db.waiters.updateOne({username: "janed"}, {$set: {name: "Jane Foxx"}})
In the code above, the username is the parameter or conditional we use in looking for Jane Doe's record, then we set the name to the new name we want to be in the database. So we are saying, check for the username in our database who is janed, then update or set her new name to Jane Foxx.
Deleting Record
One of our waiters just got another job and has now submitted his resignation letter. So we need to delete his record from the database. Let’s see how we should implement this.
db.waiters.deleteOne({username: "sams"})
Here, we are saying, go through the database and check for the waiter with username “sams”, if found, delete it. That’s how we delete a particular record from our database. We can also delete all our waiters from the database using the code below.
db.waiters.deleteMany()
To delete more than one user but not all from the database, we just need to fill in the argument or criteria to meet in our deleteMany() function. For example, if we have an age field in our database, we can delete all waiters that are 30 years of age with the code below.
db.waiters.deleteMan({age : 30})
So that’s how we performed CRUD operations in MongoDB. I hope with this guide you’ve been able to learn something about non-relational databases and also learned different MongoDB functions. There are other functions that have not been covered in this article, this is meant to be like an introduction. You can always refer to the official documentation if need be.
Further guide
MongoDB official documentation - Check it out
Brad Traversy MongoDB tutorial - Check it out


