Introduction To Socket.io Using Node Js

In information technology, we have three main types of communication patterns, these are simplex, half-duplex and full duplex communication or transmission mode.
In simplex, only one device can communicate to the other, in reality, this would be like a boss or say the president of a country giving order to his or her subordinate. Half-duplex communication mode gives room for either party or device to communicate but this can be done one device at a time. In reality, an example would be using our walkie-talkie device, where one individual finishes communicating then gives access to the other for reply. In full duplex communication, both parties can communicate effectively and simultaneously on the same channel and this kind of communication is what our cellular device uses.
Our client-server communication by default uses the half-duplex type of communication, the client initiates the communication, request for a particular resource, the server notes the request and supplies it to the client when the same is available. Limitation of this mechanism is that the connection is not open for a long time or whenever the resource is not available, the connection closes. The client has to reinitiate another request containing all header information till we get a valid response. The complexity of today’s infrastructure, software and activities has shown the inefficiency of relying on only this kind of communication pattern. For example, this will become very limiting for a social networking application. Before discussing socket.io, we are going to be looking at what long polling and also web socket which socket.io leverages are.
What is long polling?
Different solutions were developed to remedy for the above problem discussed, one of such is long polling. In long polling, after the initial request or handshake has been made by the client, the communication channel is held open by the server pending when the resource is available. However, there can also be a time limit attached to this request, if the request is not available within the slated time, the channel closes.
What is web socket?
Web socket is a protocol which gives us the feel of full duplex communication. It basically keeps the channel open and sends each message as a packet. This for example is like our double lane road, with cars moving bi-directional, each car in this analogy can be seen to be a packet sending data both ways.
SOCKET.IO
One of the beauties of frameworks is how they abstract underlying codes and give developers or users just what they need to focus on. Socket.io is a framework built on top of Engine.io, it sits on top of underlying technologies such as web sockets. Socket.io gives us our full-duplex communication pattern between client and server real time. In our example tutorial which will follow, we’ll be using socket.io to build a simple chat application which will have the feature of a public room and also a personal chat.
SOCKET.IO IMPLEMENTATION USING NODE JS
Socket.io is plugged into our client and server side of the application. Before getting into socket.io proper, let’s explore our project structure then discuss a few custom socket methods that we’ll be using throughout.
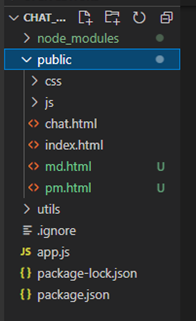
PROJECT STRUCTURE
Our project have three main folders; the node modules folder which contains all system dependencies for node js, then our public folder which contains our javascript and css folder alongside our html files. Lastly, our utils folder which we’ll be storing our custom functions. We have one main server file named app.js, this contains our server side code which listens for events from our frontend and also communicates back.
IMPORTANT METHOD TO UNDERSTAND
Io.to: This method is used to send messages. It can be used in a case of specificity, like sending messages to a particular user or room.
Socket.broadcast: This is used to send messages. Other methods like emit or to can be chained to it to send messages to everyone or a particular user.
Io.emit: This send messages to all connected clients in the system
Io.on: This listens or receives a particular event from the client side of the system. For example, when a client sends a message, it listens for that particular message and triggers a corresponding event like broadcasting that same message to other users.
Socket.join: This can be used to add a particular socket or client to a room.
CUSTOM FUNCTIONS For this particular project, we’ve made some custom functions that will assist, this can be done too inside our server file but simplicity and modularity, it’s easier to import them into our server file.
Our first custom file handles everything about our user. Since we are not using any database for this project, we’ll be storing our users in an array and every method that deals with our user will be implemented here.
const users = [];

//Join user to chat
function userJoin(id, username, room) {
  const user = { id, username, room };

  users.push(user);

  return user;
}
The above lines first initialized a user array. Then we write a function to add the user to the array, it takes an argument of the user id, username and the room which will be passed from our client side through our url. Next function is to get the current user.
// Get current user
function getCurrentUser(id) {
  return users.find(user => user.id === id);
}
This takes in the socket id, then we use a high order array function, find to search for the user array and return the user if found using the socket id as the argument.
// User leaves chat
function userLeave(id) {
  const index = users.findIndex(user => user.id === id);

  if (index !== -1) {
    return users.splice(index, 1)[0];
  }
}
The userLeave function is used to remove a particular user from the user array. We are also using a high order array function to implement this. If the user is found, we use the splice function to remove the user. Lastly on this will be our function to get all user in a particular room.
// Get room users
function getRoomUsers(room) {
  return users.filter(user => user.room === room);
}
This function takes in the room as an argument and searches through our users for all users having the same room properties, then returns the users. After which we export all our functions.
module.exports = {
  userJoin,
  getCurrentUser,
  userLeave,
  getRoomUsers,
  getUser
}
CLIENT FILES
Our client side or front end is where we mostly do our DOM manipulation, trigger events based on what a particular client has done and also listen for events from the backend. First, we initialize variables and assign them to properties from our html files, after which we write other functions that communicate with our server.
const chatForm = document.getElementById('chat-form');
const chatMessages = document.querySelector('.chat-messages');
const roomName = document.getElementById('room-name');
const userList = document.getElementById('users');
var receiver = "";

These are all our variable initialization and getting those elements from the html files.
// Get username and room from URL
const { username, room } = Qs.parse(location.search, {
  ignoreQueryPrefix: true,
});

const socket = io();
We use our query string function to get variables that are passed through our url. In this instance, we are getting our username and room information. After which we initialize our socket.
// Join chatroom
socket.emit('joinRoom', { username, room });
This emits the username and room variable which we extracted from our url using the querystring function and passed it to the server.
//Message from server
socket.on('message', (message) => {
  outputMessage(message);
// Scroll down
  chatMessages.scrollTop = chatMessages.scrollHeight;
});
socket.on function listens for a message function from the server, it receives data from the server and also uses the outputMessage function which is a custom function to insert that message into our html. The code below shows how we use the outputMessage function to manipulate our DOM and insert that message.
// Output message to DOM
function outputMessage(message) {
  const div = document.createElement('div');
  div.classList.add('message');
  const p = document.createElement('p');
  p.classList.add('meta');
  p.innerText = message.username;
  p.innerHTML += `<span>${message.time}</span>`;
  div.appendChild(p);
  const para = document.createElement('p');
  para.classList.add('text');
  para.innerText = message.text;
  div.appendChild(para);
  document.querySelector('.chat-messages').appendChild(div);
}
Wrapped in our if statement is an emit function, we first check if the message is meant for a particular user, if it is, we passed the current sender of the message, the message content and the receiver of the message to our server, if not we send to everyone. After which we clear our input box.
//Verify if the incoming message is for the whole group or a particular
  if(!receiver) {
    socket.emit('chatMessage', msg);
  } else {
    //alert(receiver);
    socket.emit('privateMessage', {
      "sender": username,
      "receiver": receiver,
      "msg": msg
    })
  }

// Clear input
  e.target.elements.msg.value = '';
  e.target.elements.msg.focus();
});
OUR SERVER FILE
Our first task on our server file is to install our dependencies. For this project, we are installing express and socket.io.
npm i express socket.io
This is how we install both packages simultaneously. Thereafter, we need to create our node js for file for our server and start writing the necessary code. Before going further, I’ll also like to point out that, I actually cloned the repository we’ll be using for this application then added the private chat functionality to it. I’ll put the link to the original repository and my own modified repository at the end of the article.
Let’s import express, socket.io into our application. We’ll have custom functions for formatting our messages and also for other user related events.
const path = require('path');
const express = require('express');
const http = require('http');
const app = express();
const socketio = require('socket.io');
const formatMessage = require('./utils/messages');
const { userLeave, getCurrentUser, userJoin, getRoomUsers, getUser } = require('./utils/users');
We also have to initialize our server using the http module which we imported. And this is how it’s done.
const server = http.createServer(app);
const io = socketio(server);
Our code would be structured into; when a user connects to a room, when a user disconnects from a room, when a message is sent to a room and when a user also sends someone a private message. Our server file will listen for all these event and also trigger a corresponding event to the client depending on whichever event was initiated from the client side. This is the communication pattern discussed initially.
We’ll have a connection wrapper event with which every other event will be embedded because a user needs to be connected before any other event can also be triggered. So this connection event wrapper will wrap every other event as it concerns the user.
io.on('connection', socket => {

}
This is our connection wrapper. The io is an instance of socket.io which we initialize at the beginning. The on method there is for listening for a connection event after which every other event can be triggered. Our first function which can be triggered will be the joinRoom. When a user joins a room, this is how it is handled.
io.on('connection', socket => {
    socket.on('joinRoom', ({ username, room }) => {
        const user = userJoin(socket.id, username, room);

        socket.join(user.room);
})
The joinRoom function takes the username and the room of a particular user which is passed in from the client. The userJoin function is part of our utility functions created to add a particular user to a room. Then socket.join is also used to add users to that room.
io.on('connection', socket => {
    socket.on('joinRoom', ({ username, room }) => {
        const user = userJoin(socket.id, username, room);

        socket.join(user.room);

        // Welcome current user
        socket.emit('message', formatMessage(botName, 'Welcome to Socket Chat!'));

        //Broadcast when a user connect
        socket.broadcast.to(user.room).emit('message', formatMessage(botName, `${user.username} has joined the chat`))

        //Send user and room information
        io.to(user.room).emit('roomUsers', {
            room: user.room,
            users: getRoomUsers(user.room)
        });

    })
Socket.emit is used to send messages to the new user. This can be a welcome message or any other kind of message.
Socket.broadcast is used to broadcast message to everyone in the room, in our case, it takes an argument which is the particular room the user has joined and a chain function of emit which informs other users that a particular user has joined the room.
Now, let’s proceed to our disconnect function.
socket.on('disconnect', () => {
        const user = userLeave(socket.id);
        if(user) {
            io.to(user.room).emit('message', formatMessage(botName, `${user.username} has left the chat`))

           // Send users and room info
            io.to(user.room).emit('roomUsers', {
                room: user.room,
                users: getRoomUsers(user.room)
            });
        }
    })
When a user disconnects, we get the event triggered from the front end that a user has disconnected from the room.
We take the user id to query our user array, if that user exists, we then emit a message to that room informing other users that someone has left the room.
LISTEN FOR MESSAGE
socket.on('chatMessage', (msg) => {
        const user = getCurrentUser(socket.id);
        io.to(user.room).emit('message', formatMessage(user.username, msg));
    })
Whenever a message is sent, this function is triggered, it takes msg as a parameter which contains the message and again we emit the message to our client.
PRIVATE MESSAGE
socket.on('privateMessage', (data) => {
        const sender = getCurrentUser(socket.id);
        const user = getUser(data.receiver);

        io.to(user.id).emit('message', formatMessage(sender.username, data.msg));
  })
The private message function takes the receiver data as a parameter from the front end. We also get the sender information through the current socket id. From here, we can emit the message to the specified user.
This will be all for our client and server. Socket.io can be used to do other realtime activities and I hope with what we’ve dealt with in this article, you can extend the knowledge to every other kind of application you are building. Below is the repository from the original creator and also my repository which has been modified to add private functionality
Original creator
(https://github.com/bradtraversy/chatcord)
Modified version
(https://github.com/Nelzluv/chat_app.)
c’est ça


